 Secure Shell or SSH is used to access a remote Linux based Virtual Private Server (VPS) or dedicated server. Using SSH you can log into the remote server’s command line interface to carry out server administration tasks. SSH connections are encrypted so its safer than using alternate methods like telnet. But because SSH is so widely used it is often the target of malicious individuals looking to compromise your server. So it’s important to secure SSH access to your server.
Stopping and starting sshd
On CentOS and (open)SUSE Linux SSH connections are handled by sshd. As root you can start, stop and restart sshd on the server as follows:
service sshd start service sshd stop service sshd restart |
The sshd configuration file is /etc/ssh/sshd_config. Once you make changes to the config file you should reload the ssh daemon:
service sshd reload |
You can safely do the above while logged in via SSH. Existing SSH connections are unaffected.
Connecting to a server via SSH
On Linux connecting to a server via SSH is as simple as typing:
ssh user@remotehost |
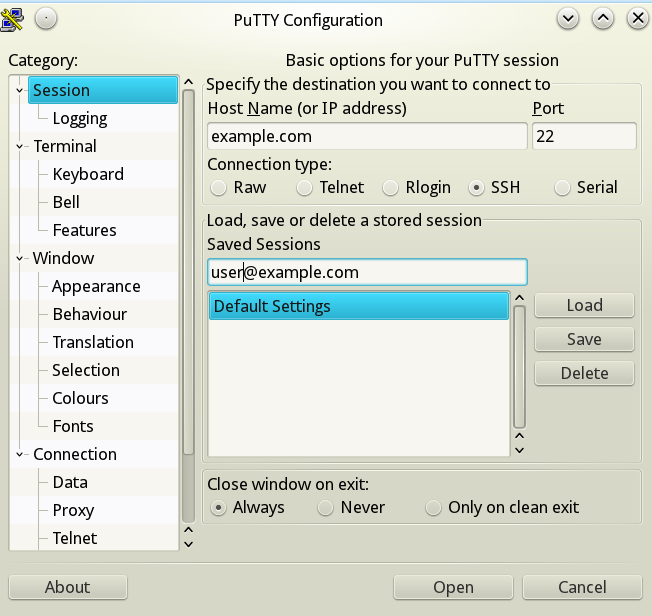
On Windows you will need the putty freeware program. It’s got a GUI so its fairly easy to use. The main window is pretty self explanatory:

Changing the SSH port
By default SSH uses port number 22 on the server for incoming connections. Most botnets out there target this port so just changing the port number can cut down on the number of attacks your server has to fend off. Just change the port line in the sshd config file:
Port 1011 |
Also poke a hole in your firewall for the new port:
iptables -I INPUT -p tcp --dport 1011 -j ACCEPT /etc/init.d/iptables save |
Be sure to reload sshd to make the above changes effective. To connect to your server you will need to provide a port number:
ssh -p 1011 user@host |
Implementing public key authentication.
Instead of using passwords to authenticate yourself with your server you can implement key based authentication. With this system you generate a private key and a public key. Data encrypted using the public key can only be decrypted using the private key and vice versa. You install your public key on your server and when you connect to it your computer will authenticate itself using the private key. What’s more the server’s public key will be downloaded onto your computer so the server will also be authenticated each time you connect. This is more secure because of two reasons:
- Brute force attacks are not possible as in the case of password based authentication. Brute force attacks are where computers are used to try thousands of possible password combinations every second in the hope that one of them might be the correct one. Because no passwords are involved brute force attacks are much harder and practically impossible.
- Man in the middle attacks aren’t possible. That is if you connect to some other server pretending to be your server you will get a warning message because that server will fail authentication. Also because no passwords are involved you can’t accidentally give away access to your own server.
Public key authentication is also more convenient because you don’t have to type in a password everytime you connect. You can also connect to your remote server using non-interactive scripts if you implement key based authentication. So automation is made possible using this method.
The downside of this authentication method is that anyone who has access to your private key file can log into your server. So never give anyone your private key file and protect it with a passphrase that you set during the key generation process. That way even if someone gets hold of your private key he won’t be able to use it without knowing the passphrase. To save yourself from having to enter the passphrase everytime you connect you can use a program like ssh-agent or putty’s pageant.
Generating the private and public key pair
The first step is to generate the requisite public/private key pair on your local computer. On Linux this is very easy to do. Just use the ssh-keygen program and follow the prompts:
abdussamad@homebase:~> ssh-keygen Generating public/private rsa key pair. Enter file in which to save the key (/home/abdussamad/.ssh/id_rsa): Created directory '/home/abdussamad/.ssh'. Enter passphrase (empty for no passphrase): Enter same passphrase again: Your identification has been saved in /home/abdussamad/.ssh/id_rsa. Your public key has been saved in /home/abdussamad/.ssh/id_rsa.pub. The key fingerprint is: b3:e5:f2:df:12:e8:7f:8c:20:15:93:ff:d0:d6:3d:a7 abdussamad@homebase.site The key's randomart image is: +--[ RSA 2048]----+ | . | | + | | + . ..| | . o o.+| | S... + .o| | .=o . E | | oo.. + | | o. o.o | | .ooo. | +-----------------+ |
If you are using Windows you will need the puttygen program to generate a key pair. Using it is pretty straight forward. You just hit the generate button and move your mouse around the blank area to generate some random data. Then save the private key file somewhere on your local filesystem. You can add it to putty using the main window left side menu > Connection > SSH > Auth > ‘Private key file for authentication’ field.
You also have to copy-paste the public key generated by puttygen into the authorized_keys file on your server as explained in the next section below.
Installing the key on your server
If your using Linux on your PC you can automatically install the SSH keys using the following command:
ssh-copy-id '-p 1011 user@remotehost' |
Alternatively you can manually install the keys by creating a directory on your server under the user’s home directory:
mkdir ~/.ssh touch ~/.ssh/authorized_keys chmod 700 ~/.ssh chmod 600 ~/.ssh/authorized_keys |
Now copy the public key in ~/.ssh/id_rsa.pub on your local machine to the authorized_keys file on your server. The entire key is on one line. You can add more authorized keys on additional lines if you like.
Enable public key authentication
Edit the sshd config file /etc/ssh/sshd_config to enable public key authentication:
PubkeyAuthentication yes |
Save the file and restart or reload sshd. Then try to connect to the remote server using another console or copy of putty. Keep your current ssh connection active incase you made a mistake somewhere and password-less connection doesn’t work.
If you can connect without being prompted for a password then you can go ahead and disable password based authentication in the sshd_config file:
PasswordAuthentication no |
If you can’t connect look for clues as to what might be going wrong in the server log file /var/log/secure. Usually incorrect permissions on the user’s .ssh directory can cause problems. Refer to the chmod statements above for the correct permission levels.
Disabling root login
One additional step you can take to secure SSH access is to disable remote root login entirely. If you do this you will have to login as a normal user and use sudo to get root access. Disabling root login via SSH is an entirely optional step.
To disable root login just set this option in sshd_config:
PermitRootLogin no |
Conclusion
Securing SSH access is one of the most important steps in securing your web server. Just changing the SSH port can lead to a significant reduction in attacks. Implementing public key authentication allows you to conveniently and securely log into multiple servers using a single public/private key pair.
2 thoughts on “CentOS Linux: Secure password-less SSH access”